Friday, December 20, 2013

Crock Pot Chicken & Rice

Holy moley this is just what the doctor ordered for this cold wintery day! Especially since I've been working overtime for the holidays and I've had a cold all last week, this was so easy and so delicious! Uses basic ingredients I know you have on hand, and can feed a crowd, or works great as leftovers. 

Ingredients:
2-3 chicken breasts
1 cup brown rice
2 1/4 cup water
1 can cream of chicken
2-3 cloves garlic minced
1/4 cup finely chopped onion
Salt & pepper to taste

Combine all ingredients into crockpot on high heat for 4-6 hours, or on low for 6-8 hours. Stir before serving and enjoy! Chicken should be soft enough to shred apart with just a fork or spoon once served.


Friday, November 8, 2013

Queso Magnifíc

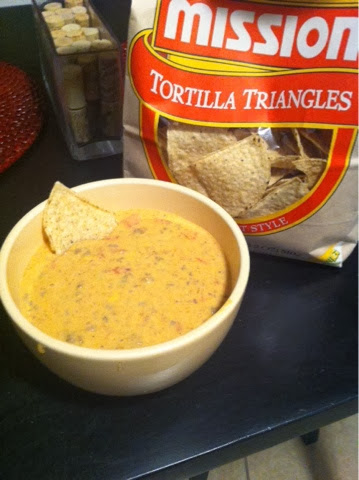
I’m pretty sure there’s an unwritten code that says if you’re from Texas then there queso in your blood, as in, you know what good queso tastes like and you won’t settle for less than the best! I used to call this queso fundito to until I tried the disgusting stringy greasy melted cheddar mess of a queso fundito that is popular at some Mexican restaurants. Not to discriminate, but that's just not my thing, and I don't want my deliciously creamy queso to be confused with anything... lesser. Hmph. What I have created is a masterful combination of quesos and taco, and tell me honestly, who doesn’t love tacos?! #tacoparty #tacosarelife.

Do you need another reason? Okay, well here it is; you can make this in the crock pot. Mic. Drop. Just know you’ll have to half the recipe to make this in a 1 qt crock pot, but really, who would want to do that????

Ingredients
1 lb ground beef
Taco seasoning
OR you can use your home made blend of: cumin, garlic, onion, salt pepper, cayenne, & paprika
1 brick processed cheese - cheese plastic I know but it’s the perfect consistency!
1 can refried beans
1/2 cup sour cream
4 oz cream cheese
1-2 cans rotel (mild or hot, depending on desired spicyness)
1/4 cup chopped green onions
Guacamole or avocado for garnish
Tortilla chips for serving

Set crock pot to high heat. Brown beef over medium heat until cooked thoroughly. Season meat with taco seasoning before adding to crock pot.

Cut processed cheese bock into small squares and add to crock pot with remainder of ingredients. Do not drain any juices, but include them in the mix.

Stir queso occasionally to ensure even melting. Let heat about 20 min or until contents are melted and thoroughly mixed before serving. 


Saturday, October 26, 2013

Hawaiian Salmon Rolls

Perfect little finger snacks; sweet, savory, and a total crowd-pleaser. 

Ingredients:
4 packages of set of 4 Hawaiian sweet rolls
Cream cheese
Smoked salmon slices
Sliced breakfast ham
Oregano

Preheat oven to 400 degrees. 

Slice roll in half and smear cream cheese in each half. Place a slice of salmon and a slice of ham between the halves. Top rolls with oregano. 

Place in oven for 10-15 minutes or until cream cheese is melty creamy and bun is slightly toasted.

This will not cook the salmon thoroughly, so please be advised that this does contain raw fish.

Chicken Flatbread Pizza

Healthy and tasty, I adore this twist in traditional pizza with a delicious flatbread. You can add virtually any favorite toppings, but here's something to get you started. 

Ingredients:
Package of flatbreads from the local grocery
1 can pizza sauce
Chopped chicken breasts
Chopped onions
Chopped spinach
Chopped cauliflower
Chopped mushrooms
Feta cheese crumbles
Shredded cheddar

Preheat oven to 350 degrees. 

Place flatbreads in a baking sheet and bake for 7 minutes. This will prevent the bread from becoming soggy. 

Top cooled flatbread with pizza sauce and desired toppings. Place in oven for 15-20 minutes or until cheese is melted and pizza is headed through (cooking time can depend on toppings).


Pumpkin Shaped Spice Cake


Yet another pinterest project, but I just couldn't resist!! It's the cutest Halloween decoration and hello its EDIBLE and delicious! Plus its just fun to do something a little different with such a staple at my house. Yes, cake is a staple, I bake for every occasion!! This may look a bit intimidating but I assure you this is a SUCH an easy project, and if I would have had some foresight (which I of course will share with you) then it would have turned out even cuter! This will take about 4 hours to complete so I recommend starting early, since each cake will have to bake about 1 hour each, plus cooling time, & frosting time.

Ingredients:
2 boxes of cake mix - I suggest pumpkin, spice, carrot, or any other fall inspired flavor
correlating ingredients for your respective mix (i.e. eggs, water, butter, oil, milk, etc.)
Bundt pan
3 cans of orange icing, or can use white icing and red & yellow food coloring to make orange
1 can chocolate icing
Green decorative icing
Flat bottomed ice cream cones (green or brown desired), kit kats, or stem-making item (get creative!)

Begin by baking both cakes according to package directions in a greased Bundt pan, and let cakes cool thoroughly before icing. If you have read my prior posts you know I like to put my own twist on box cake mixes, the Rule is: substitute milk instead of water, add an egg, and substitute butter for oil and double the amount.

Place one cake round side down on plate and spread a layer of orange icing over the flat surfacec before placing the other cake round side up on top. 

Dirty ice cake with a thin layer of orange icing and refrigerate 30 min to set icing. Frost cake with remainder of frosting finishing with vertical strokes with a flat piping bag attachment.

To make stem, frost ice cream cone with chocolate icing if you could not find a green or brown one. Place ice cream cone in center of cake. Frost leaves and vine with green icing with a small round piping bag attachment. I did not have any ice cream cones since I made this cake partially on a whim so I stuck a plastic cup down the center of my cake and tied about 8 Kit Kats together with a green ribbon and set them on top of the cup in the middle of the cake.

To create the face, place chocolate icing in piping bag or ziplock bag with hole cut in the tip and draw on a pumpkin or jack-o-lantern face with a small round attachment. Accent with candies if desired.

Monday, September 30, 2013

Grey Chic - Old Dresser Overhaul

This is a project I have been wanted to do for a WHILE, like ever since I came I to possession of this dresser while. I love the chic and timeless look of a grey dresser, it was something that I have dreamt of for a while, so it was an obvious choice to breathe new life into this eyesore. Prior to my ownership this dresser belonged to my stepmother and my dad who found it at a flea market, and was used in both my stepsister and stepbrothers rooms. It has the original tag in the top drawer that says it came from the United Furnitire Corporation out of Lexington, North Carolina, and something about it wouldn't let me just trash it. Call it my crazy belief that I can salvage nearly anything but let me tell you, this yellow vinyl scratched up banged up broken pieces dresser was a big challenge. 


It came to me with the bottom drawer having been broken on the corner and poorly glued back into place, so before I began proper sanding I purchased some glue filler from the local hardware store to fill in the gaps. Thankfully I picked out the new hardware ahead of time as well, because I had to fill one of the existing hardware holes and drill new ones to fit my modern selections. 


The wood filler is like a putty that dries to the same consistency of wood, you can see the filled holes (it shows up a lighter color than the wood) in the below pictures of the sanded and stacked drawers. I overfilled the holes a little so when they dried they wouldn't shrink too much, since you can always sand it down.


I used an 80 grade sandpaper with my electric sander to get all the old paint off and smooth the imperfections, which took roughly 4 hours total. Talk about sawdust and sore hands, I have a brandnew appreciation for my precious Poppa who taught me everything I know about woodwork and powertools. Everywhere, I mean everywhere, that there was sweat there was a layer of sawdust. Even on the bottoms of my feet! And I had to blow the sawdust off the dresser two or three times before I started painting because there was so much in the air it kept settling back.

Once I had everything sanded down I used a finer 120 grade sandpaper to smooth everything and help close the wood cuticle so it didn't eat paint like a black hole.


I let the wood rest overnight in the cool garage and then I used two cans of white wood primer spray paint to cover the wood, again to prevent it eating all my paint, and let it dry for a few hours. Now, don't ask me why I picked spray paint for a dresser.. I genuinely thought it would be quick as easy and wouldn't take too much paint, plus it would give a seamless even coverage.. Well it did on the last part.. But it took 7 cans of Krylon Colormaster in Classic Grey Gloss to cover this whole thing!!! Whew!


I ended up having to do two coats of paint as well because this old wood was thirsty!! Maybe I should have used more primer before I started with the grey but, you live and you learn, right? Anyway, here is the finished dresser in its new home of my guest bedroom, plus the gorgeous yet simple hardware! I went with a 6" silver bar for the handles on the bigger drawers, and a pretty little crystal knob for the top two drawers.


And since I'm obsessed with this new split pic app I have here is a side by side before and after of my new dresser!


Saturday, September 28, 2013

Pumpkin Carmel Blondies


When I found this recipe it was titled Ooey Gooey Pumpkin Blondies, a pretty befitting name I think. These delectable little treats were super fun to make, and my faithful taste tester (she has such a hard job) was elated that its finally the time of year for all things pumpkin. These blondies have two versions for the carmel sauce that goes in the middle, so you can choose which to use. I of course chose the one that is infinitely harder to make, and infinitely easier to mess up, which I did on my first attempt.

Ingredients:
For the Blondies - 
3/4 cup butter, softened
1 cup brown sugar, packed
2 eggs
1 teaspoon vanilla
1 cup pumpkin puree
1 teaspoon cinnamon
1/2 teaspoon nutmeg
1 3/4 cups flour (I used wheat, but you could also use half wheat, half white, or all white)
1 teaspoon baking soda
1/4 teaspoon salt

For the filling -
1/2 cup chopped walnuts or pecans
1/2 cup semi-sweet chocolate chips

For the carmel sauce -
Option 1 - easy
1 14oz package carmels
1/4 cup heavy cream
Option 2 - advanced
1/2 cup sugar
2 tablespoons water
1/2 cup evaporated milk
2 tablespoons butter
1/2 teaspoon vanilla

Begin by preheating the oven to 350 and greasing a 9x13 (or your choice) baking pan.

Cream the butter and brown sugar until light and fluffy. Add in the eggs, pumpkin puree, and vanilla until well combined. Add dry ingredients: flour, cinnamon, nutmeg, baking soda, and salt.Combine until mixed well, but don't over-mix.

Spread 2/3 of blondie mix into the bottom of your pan. Cover with chopped nuts and chocolates.


Option 1 of carmel sauce: 
Place cream and carmels into microwave save dish or stove-top pan and heat to melt at medium heat, stirring frequently, or about every 20 seconds in the microwave, until melted thoroughly.

Option 2 of carmel sauce: 
Heat a pot on medium heat, and add sugar and water. Allow mixture to boil, stirring occasionally.
After two minutes or so the color will begin to change, slowly at first. Once it has changed to a maple color turn off the stove and set the mixture aside to cool for a minute.
While stirring vigorously, slowly (very slowly) add the evaporated milk. The mixture will bubble. Stir Stir Stir.
Continue to stir while adding the butter and vanilla extract. Keep stirring.

Carefully pour the carmel mixture over the existing batter in the baking dish, and spread to cover. Then add remainder of blondie mixture over top of the carmel layer and carefully spread to cover.


Bake for 23 minutes or until toothpick inserted into the center comes out clean, save for a bit of carmel ;)


Let cool slightly before serving! *also pairs great with ice cream!*

Friday, September 27, 2013

The Spoon Wreath


So I found this project on Pinterest... Isn't that how it always starts ;) and I couldn't wait to try it out! It's simple, cute, and I'm a huge fan of customizable! Plus, it's a project that can be done all in one day, using supplies that are either already around the house or very easy (and cheap!) to find!

I did mine with a 6" mirror and chose to have 5" of 'spoon space' around that, making a total diameter of my backing 15". You can choose whatever size you want for yours, but for the purpose of this tutorial we will be using my measurements.

You Will Need: 
1 round mirror (mine was 6")
1 large piece of cardboard (mine needed to be at least 17 inches in each direction)
Approximately 200 plastic spoons
1 pair of scissors 
1 glue gun
Approximately 7 glue sticks
1 can of spray paint (color of your choice)
1 bread tie, can tab, or other hanging device

I started out by using a makeshift protractor to draw a circle one inch smaller than the size of my mirror, or 5" diameter, and 3.5" from the center of the protractor.

Next I measured from the same place in the center of the 5" circle to draw a circle again to create the 'wreath', I did mine 15" diameter (5" for mirror, 5" for wreath (10" total)), so 7.5" from the center of the protractor.

Cut the cardboard along the drawn lines to create your wreath.

The most labor intensive part of this is cutting the handles off the spoons. I cut roughly 200 for my whole project, and then determined I needed 15 to surround the inside of the wreath, and cut them very closely and carefully off the handle to create a round finished shape.


Now is the fun part! Gluing the spoons onto the wreath! I started from the inside and used an alternating pattern until I got closer to the outside.


Once you are closer to the outside start just filling in holes instead of focusing on the pattern. You may have to step back a few times to make sure you got it even all the way around. 


*important note, before you begin painting get rid of all those pesky stringy things your glue gun leaves behind*

I put little dots of glue in the spaces between the spoons on the inside of the wreath to give it a more finished look as opposed to bits of cardboard sticking out.


Painting is super easy, just paint in a sweeping motion angling from the outside in to get in between the spoons before painting across the front. Once the front is dry I suggest painting the back.

Once you are done painting and everything is dry, put a line of hot glue around the back of the wreath on the edge of the inside hole and carefully place the mirror down onto it. I used a bread tie to hang my wreath, securing it with some hot glue. 


Finished product! 


Sunday, September 22, 2013

Paleo Flourless Chocolate Brownies

Although I still prefer old fashioned baking for myself, there is no denying that flourless, gluten free, sugar free, and many other recipes are becoming all the fad. I finally caved in and decided to try these 'imposter' brownies as I consider them. You know, I have to admit, they are pretty good! Now, you aren't gonna get the ooey gooey melty brownies we all know and love, but you do get a rich chocolatey taste in a thick moist cake, just don't get mad that I added a little agave syrup garnish on mine to add a little sweetness, however I would have used chocolate syrup did I have any in the house. Ooh I just realized, raspberry syrup would also be heavenly... Mmmm. 

Ingredients: 
1/4 cup coconut flour
1/4 cup almond ground
1/3 cup raw cocoa powder

4 large eggs
1/3 cup raw agave (or honey)
1/3 cup apple sauce
2 teaspoons vanilla
1/3 cup canola oil

Preheat oven to 350 degrees F and spray 8x8 dish with non stick cooking spray.

Combine dry ingredients in small mixing bowl and set aside. In large mixing bowl combine remaining ingredients and whisk until combined. 

Add dry mixture to wet mixture stirring. Whisk or beat 2 minutes or until combined. Pour into dish and bake 25 minutes or until middle is set and toothpick comes out clean when inserted into middle (depends on thickness). 


These little bars are so rich that just a little sliver should satisfy your sweet tooth, and as you noticed I added a little agave nectar to mine for a touch of sweetness.

Peach & Grape Smoothie

Felt like having a fresh, deliciously tasty and light, guilt-free snack this afternoon and what better way than with a smoothie! Ok let's get started so I can get back to sipping my snack!

Ingredients: 
2 peaches
Handful of purple grapes
1 cup Greek yogurt
1 teaspoon vanilla
1 teaspoon agave (or honey)
Handful of ice cubes 

Slice peaches roughly and add all ingredients to blender. Blend until smooth, insert a straw, garnish with peach slice, and enjoy! 

Warning: you may be forced to share said smoothie with a hungry guy and a sneaky green bird


Thursday, August 29, 2013

Coconut & Orange Cheesecake Bars

Toasted coconut make the foundation for this delicious cheesecake infused with fresh squeezed California orange juice from the tree in my back yard. Fresh and creamy this is perfect (and easy!) for a warm summer night. I doubled this recipe to fit into my beautiful scalloped dish passed down to me from my late great-aunt Jannie.

Ingredients:
1/2 cup coconut
3/4 cup graham cracker crumbled
2 tablespoon sugar
1 teaspoon fresh zested orange peel
1/4 cup melted butter

1 8oz package cream cheese softened
1/3 cup sugar
1 teaspoon vanilla
1/4 cup fresh squeezed orange juice
1 egg
1 mango halved seeded and chopped for garnish

Preheat oven to 350 degrees F. Spread coconut on a baking sheet and bake uncovered 2-3 minutes or until toasted.

For crust: place 2 tablespoons of roasted coconut in a food processor. Add graham cracker crumbs, sugar, and orange zest. Mix to combine, and slowly add melted butter by alternating off and on until the mixture comes together. Press into the bottom of a 9x9 pan. Bake 10 minutes and then cool on rack.

And after butter is added 
Pressed into pan


For filling: in large bowl beat cream cheese, sugar, and vanilla with mixer until combined. Add orange juice and beat until smooth. Stir in egg and pour mixture over baked crust.

Bake 15 minutes or until center is just set. Cool, then cover and chill 2 hours. 

Spoon mango onto bars and sprinkle with remainder of toasted coconut. 


Spaghetti Carbonara

This is a classic Italian dish my family loves. It's a recipe that has been in my family for years, and is definitely a staple  for get-togethers. It's filling, delicious, and quick to make, plus everyone always gets seconds. 

Ingredients:
1 box your choice noodles (classic uses spaghetti, but why not mix it up a bit!)
1 lb bacon sliced 
1/4 cup onion
2 tablespoons grease (reserved from cooked bacon
4-5 eggs
3 tablespoons milk or cream
1 1/2 cup grated Parmesan 

Boil a pot of water and cook pasta as directed, then drain and return to pot.

Meanwhile fry bacon and onions until bacon is crisp. Reserve grease as directed. Add milk to bacon mixture and simmer on low heat.

Beat eggs and add Parmesan. Mix bacon and then egg mixture with pasta in a large pot, and toss until eggs are partially set. Serve warm. 


As you can see I used penne pasta, and added grilled chicken for extra protein. Get creative with yours too! Personalization is the best way to create a memorable dinner staple.

Wednesday, August 28, 2013

Wheat Cinnamon Scones

May I just start with holy delicious! Really felt that baking itch tonight and these babies jumped out at me from my handy Pinterest board. Easy to make and easy to please. Lets begin!

Scones:
2 cups wheat flour
2 teaspoons baking powder
1/2 teaspoon baking soda
1/2 teaspoon salt
1/2 cup butter

1 egg yolk
3 tablespoons honey (or agave)
1/3 cup buttermilk (or substitute 1/3 cup milk and 1/2 teaspoon orange or lemon juice)

Crumb topping:
1 egg white
3 tablespoons sugar
1 teaspoon cinnamon

Glaze:
1 cup powdered sugar
4 teaspoons milk
1/2 teaspoon vanilla

Combine the flour, baking powder, baking soda, and salt. Cut in butter until mixture is crumbled.

In a separate bowl combine egg yolk, honey, and buttermilk. Then mix into dry mixture until dough forms.


Place dough on floured surface. I used a round pizza pan to avoid having to transfer surfaces but it will work either way. Roll the dough out to 1/2 inch thick and try to keep dough in a rounded shape, then cut into eight pieces like a pizza.


Whisk egg whites together and brush onto dough. Then mix together sugar and cinnamon and sprinkle evenly over the dough. 


Place the dough into an oven preheated to 400 degrees for 10-11 minutes. While the scones are baking mix together the powdered sugar, milk, and vanilla until glaze forms. 


 Once the scones are out of the oven pour the glaze over them immediately. Let cool for 2-3 min before serving. Enjoy!


Wednesday, July 10, 2013

Broccoli & Pasta Salad

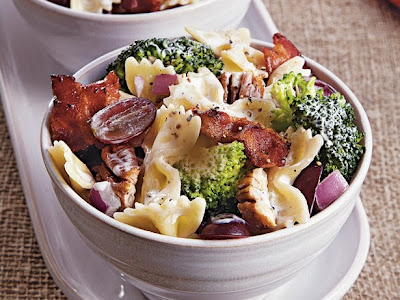
This delicious and fresh salad was a huge hit at my 4th party this year (yea yea I know I'm a little late posting!) I got it from the lovely Southern Living website and I will definitely be using it again soon!


Ingredients:
1 cup chopped almonds
16oz pasta (I suggest bowtie or rigatoni)
1 1/2 lbs fresh broccoli
1/3 c diced red onion 
2 cups seedless red grapes
8 bacon slices cooked and crumbled 

Sauce: 
1 cup mayo
1/3 cup sugar
1/3 cup red wine vinegar
1 tsp salt

Prepare pasta according to package directions. 

Cut broccoli into small pieces, and halve grapes. 

Whisk together all sauce ingredients and pour over broccoli, cooked pasta, onion, and grapes in large bowl and stir to coat. 

Cover and chill 3 hours. Add bacon and almonds to salad just before serving.

You may find this gone so quickly you will need to double your recipe! 

White Chili with Chicken

Navy beans are my new found favorite legume, and although they are always better when soaked for hours before use, I took a shortcut tonight and used the canned kind. Chalk it up to procrastination but nevertheless is was just as delicious. I made this as a spinoff from a recipe I received from my aunt that includes navy beans and ham, and about 8 hours of cooking in the crockpot -- I ain't got time for that!

Ingredients: 
2 cans white beans (also called navy beans)
1 can cream of mushroom (alternately can use cream of chicken or celery)
1 or 1 1/2 cups chicken broth -- by preferred consistency
2 chicken breasts
Salt & pepper to taste
Optional chicken grilling seasoning


Add beans, cream of, and chicken broth in a large pot and heat over medium heat.

Flatten chicken breasts to 1/4 inch thickness and place over medium heat in a fry pan about 4 minutes on each side or until cooked thoroughly.

Remove cooked chicken from heat and cut or shred into small pieces and add to pot. Season with spices and let simmer 15-29 minutes.

The trick is in the simmering particularly when dealing with canned beans as it allows the seasonings to sink in and creates a more flavorful meal that tastes more expensive than it costs.

Enjoy!

Wednesday, June 26, 2013

Honey Dijon Salmon

This is an exciting new way to make salmon and will absolutely become a staple at your dinner table.

Ingredients
4 salmon filets
1/4 cup butter
3 Tbsp Dijon mustard
1 1/2 tablespoons honey (I used Agave Nectar and it was divine)
1/4 cup Italian bread crumbs
1/4 finely chopped pecans
4 tsp parsley
Salt & pepper
Lemon rounds for garnish


Preheat oven to 400 degrees Fahrenheit.

In a small bowl stir together butter, mustard, and honey, and set aside.

In another bowl mix together bread crumbs, pecans, and parsley.

Place salmon in a non-stick pan and brush tops with mustard mixture and sprinkle with bread crumb mixture. 

Bake salmon for 12 - 15 minutes in preheated oven until it flakes with a fork. Garnish with the wedge of a lemon.

Be prepared to have a taste bud explosion!!

Tuesday, June 25, 2013

Spinach & Mushroom Stuffed Pork Chops

Deliciously juicy butterfly pork chops filled with fresh spinach and mushrooms. Sprinkled with cheese and seasoned to perfection you and yours will adore this easy meal.

Ingredients
4 butterfly pork chops pounded to 1/4 inches thick
1 pkg of raw mushrooms diced
2 cups chopped spinach
1 cup shredded cheddar cheese
Salt & pepper
2 tsp chili powder
8 toothpicks 

Preheat oven to 350 degrees Fahrenheit.

Place diced mushrooms over medium heat in a fry pan and stir occasionally 5-7 minutes or until cooked thoroughly

Layer spinach, mushrooms, and then cheese on the pork chops before rolling up and securing with 2 toothpicks


Place stuffed pork loins in a non-stick pan and sprinkle with salt & pepper and chili powder. 

Place in oven for 45 minutes or until pork is no longer pink. Cool 5 minutes before serving.


I was so full I couldn't even finish!